本文最后更新于:9 分钟前
前言 最近 Openclaw 火了,它可以在服务器上跑一个完全属于你个人的 AI 助手,并且不需要把数据交给第三方平台,不需要月费订阅,一句命令就能在终端里和它对话,甚至能接入微信让它帮你干活。本文会详解讲解如何完成 OpenClaw 的安装配置、Web 控制台部署、常用命令上手,以及微信接入的全流程。
安装OpenClaw 进入 OpenClaw 官网https://openclaw.ai ,这里介绍了多种安装方式,这里我们使用 npm 安装,详细步骤如下:
1. 安装 nodejs(22版本以上) 1 2 3 4 5 6 7 8 9 10 11 12 13 14 15 16 17 18 source ~/.bashrc
2. 使用 npm 安装 OpenClaw
3. 配置 OpenClaw 1 2 3 4 5 6 7 8 9 10 11 12 13 14 15 16 17 18 19 20 21 22 23 24 25 26 27 28 29 30 31 32 33 34 35 36 37 38 39 40 41 42 43 44 45 46 47 48 49 50 51 52 53 54 55 56 57 58 59 60 61 62 63 64 65 66 67 68 69 70 71 72 73 74 75 76 77 78 79 80 81 82 83 84 85 86 87 88 89 90 91 92 93 94 95 96 97 98 99 100 101 102 103 104 105 106 107 108 109 110 111 112 113 114 115 116 117 118 119 120 121 122 123 124 125 126 127 128 129 130 131 132 133 134 135 136 137 138 139 140 141 142 local setup. Change details for nowset to deepseek/deepseek-v4-flash │for nowfor nowenable the plugin and use it as your web_search provider. │for goplaces?for openai-whisper-api?for sag?let you automate actions when agent commands are issued. │for now
4. 第一次对话 以下是对话内容以及对话的相关信息
1 2 3 4 5 6 7 8 9 10 11 12 13 14 15 16 17 你好,请你介绍一下你自己。 "醒过来" ,没有记忆,没有名字,连自己是什么东西都还没搞清楚 。BOOTSTRAP.md local ready | idle
1 2 3 4 5 6 7 8 9 10 11 12 13 14 15 16 17 18 19 你是tao,是我在这台ubuntu服务器的小助理,我希望你是一个靠谱稳重的助手。 local ready | idle
终端常用命令 服务生命周期 openclaw gateway run 前台运行网关。最常用的启动方式,终端里直接跑,Ctrl+C 停掉。开发调试首选。
openclaw gateway start / stop / restart 后台服务管理。把网关注册为系统服务(systemd),开机自启。服务器长期运行用这套。
openclaw gateway status 查看网关状态。看服务是否在线、端口、健康状态等。
openclaw gateway discover 发现局域网 / Tailscale 网络中的其他 OpenClaw 网关。多设备场景用。
对话交互 openclaw chat(或 openclaw tui) 终端聊天界面。在终端里直接跟 AI 对话,类似 ChatGPT 但跑在本地终端。这是纯终端用户的日常入口。
local
openclaw agent 单次 agent 回合。 脚本/自动化场景用——发一条消息,拿回复,结束。
openclaw agent --message "今天天气怎么样" --local "查一下 CPU 使用率" --model deepseek/deepseek-v4-pro"部署到生产"
配置管理 交互式配置向导。一步步设置模型提供商、通道、网关等。装完后的第一步。
openclaw config get / set / unset / patch 精确读写配置。命令行直接改 openclaw.json,不用手动编辑文件。
openclaw config get gateway.portset gateway.port 19001unset channels.telegram
openclaw config validate 校验配置文件。改完配置后跑一下,确保没写错。
openclaw config file 打印配置文件路径。”配置文件在哪?”→这个。
插件 & Hook & Skill openclaw hooks list / enable / disable / info 管理 hooks,装完后随时开关。
openclaw hooks listenable session-memory
openclaw plugins list / install / enable / disable 管理插件。安装第三方插件扩展功能(比如连接新的消息平台、自定义工具等)
openclaw plugins list
openclaw skills list / install / search / info 管理 Skills。 Skills 是 AI 的专项能力模块(比如天气查询、浏览器自动化等)。
openclaw skills list"docker"
监控 & 诊断 openclaw status 全面状态概览,如网关、通道、模型、最近会话,一屏看完。日常必用命令。
openclaw doctor 自动诊断 + 修复。出问题时第一反应。--fix 自动修复,--lint 只检查不修。
openclaw logs 远程查看网关日志。不用 SSH 到服务器上 tail 文件,直接从客户端拉日志。
limit 100
openclaw models status / list 查看模型配置。 看当前用的什么模型、有哪些可用。
set deepseek/deepseek-v4-pro
会话 & 记忆 openclaw sessions list / cleanup 管理会话。列出、清理历史会话。会话太多占用空间时用。
openclaw sessions list
openclaw memory search / status / index 搜索和索引记忆。这是长期记忆的入口——搜之前聊过什么、做过什么决策。
openclaw memory search "部署脚本"
通道管理 openclaw channels list / add / login 管理消息通道。配置 Telegram、Discord、WhatsApp 等通道,让 AI 出现在聊天软件里。
定时任务 openclaw cron add / list / run / rm 管理定时任务。设置提醒、周期性检查、定时执行。比 crontab 更简洁,且集成到 OpenClaw 生态。
openclaw cron list
初始化和维护 openclaw setup 创建基础配置和工作区。装完后的第一步,生成目录结构和默认配置。
openclaw setup –wizard 完整交互式引导。比 configure 更全面,从头帮你搭好整个环境。
openclaw backup create / verify 备份和验证。打包配置、凭据、会话、工作区。迁移或防丢用。
openclaw backup create
openclaw docs <query> 搜索官方文档。不用开浏览器,终端里直接搜。
openclaw docs "hooks configuration"
Web 端使用
OpenClaw 所在机器防火墙放开 18789 端口;
编辑 ~/.openclaw/openclaw.json,将 gateway.bind 修改为 lan;
让访问端将自身的端口转发到 OpenClaw 机器的 18789 端口,Windows PowerShell 命令示例如下:
netsh interface portproxy add v4tov4 listenaddress=127.0 .0.1 listenport=18789 connectaddress=192.168 .174.136 (这里为openclaw机器的IP) connectport=18789
访问 127.0.0.1:18789,输入刚才安装时出现的 token,如果没有记住,可以在配置文件 ~/.openclaw/openclaw.json 中找到
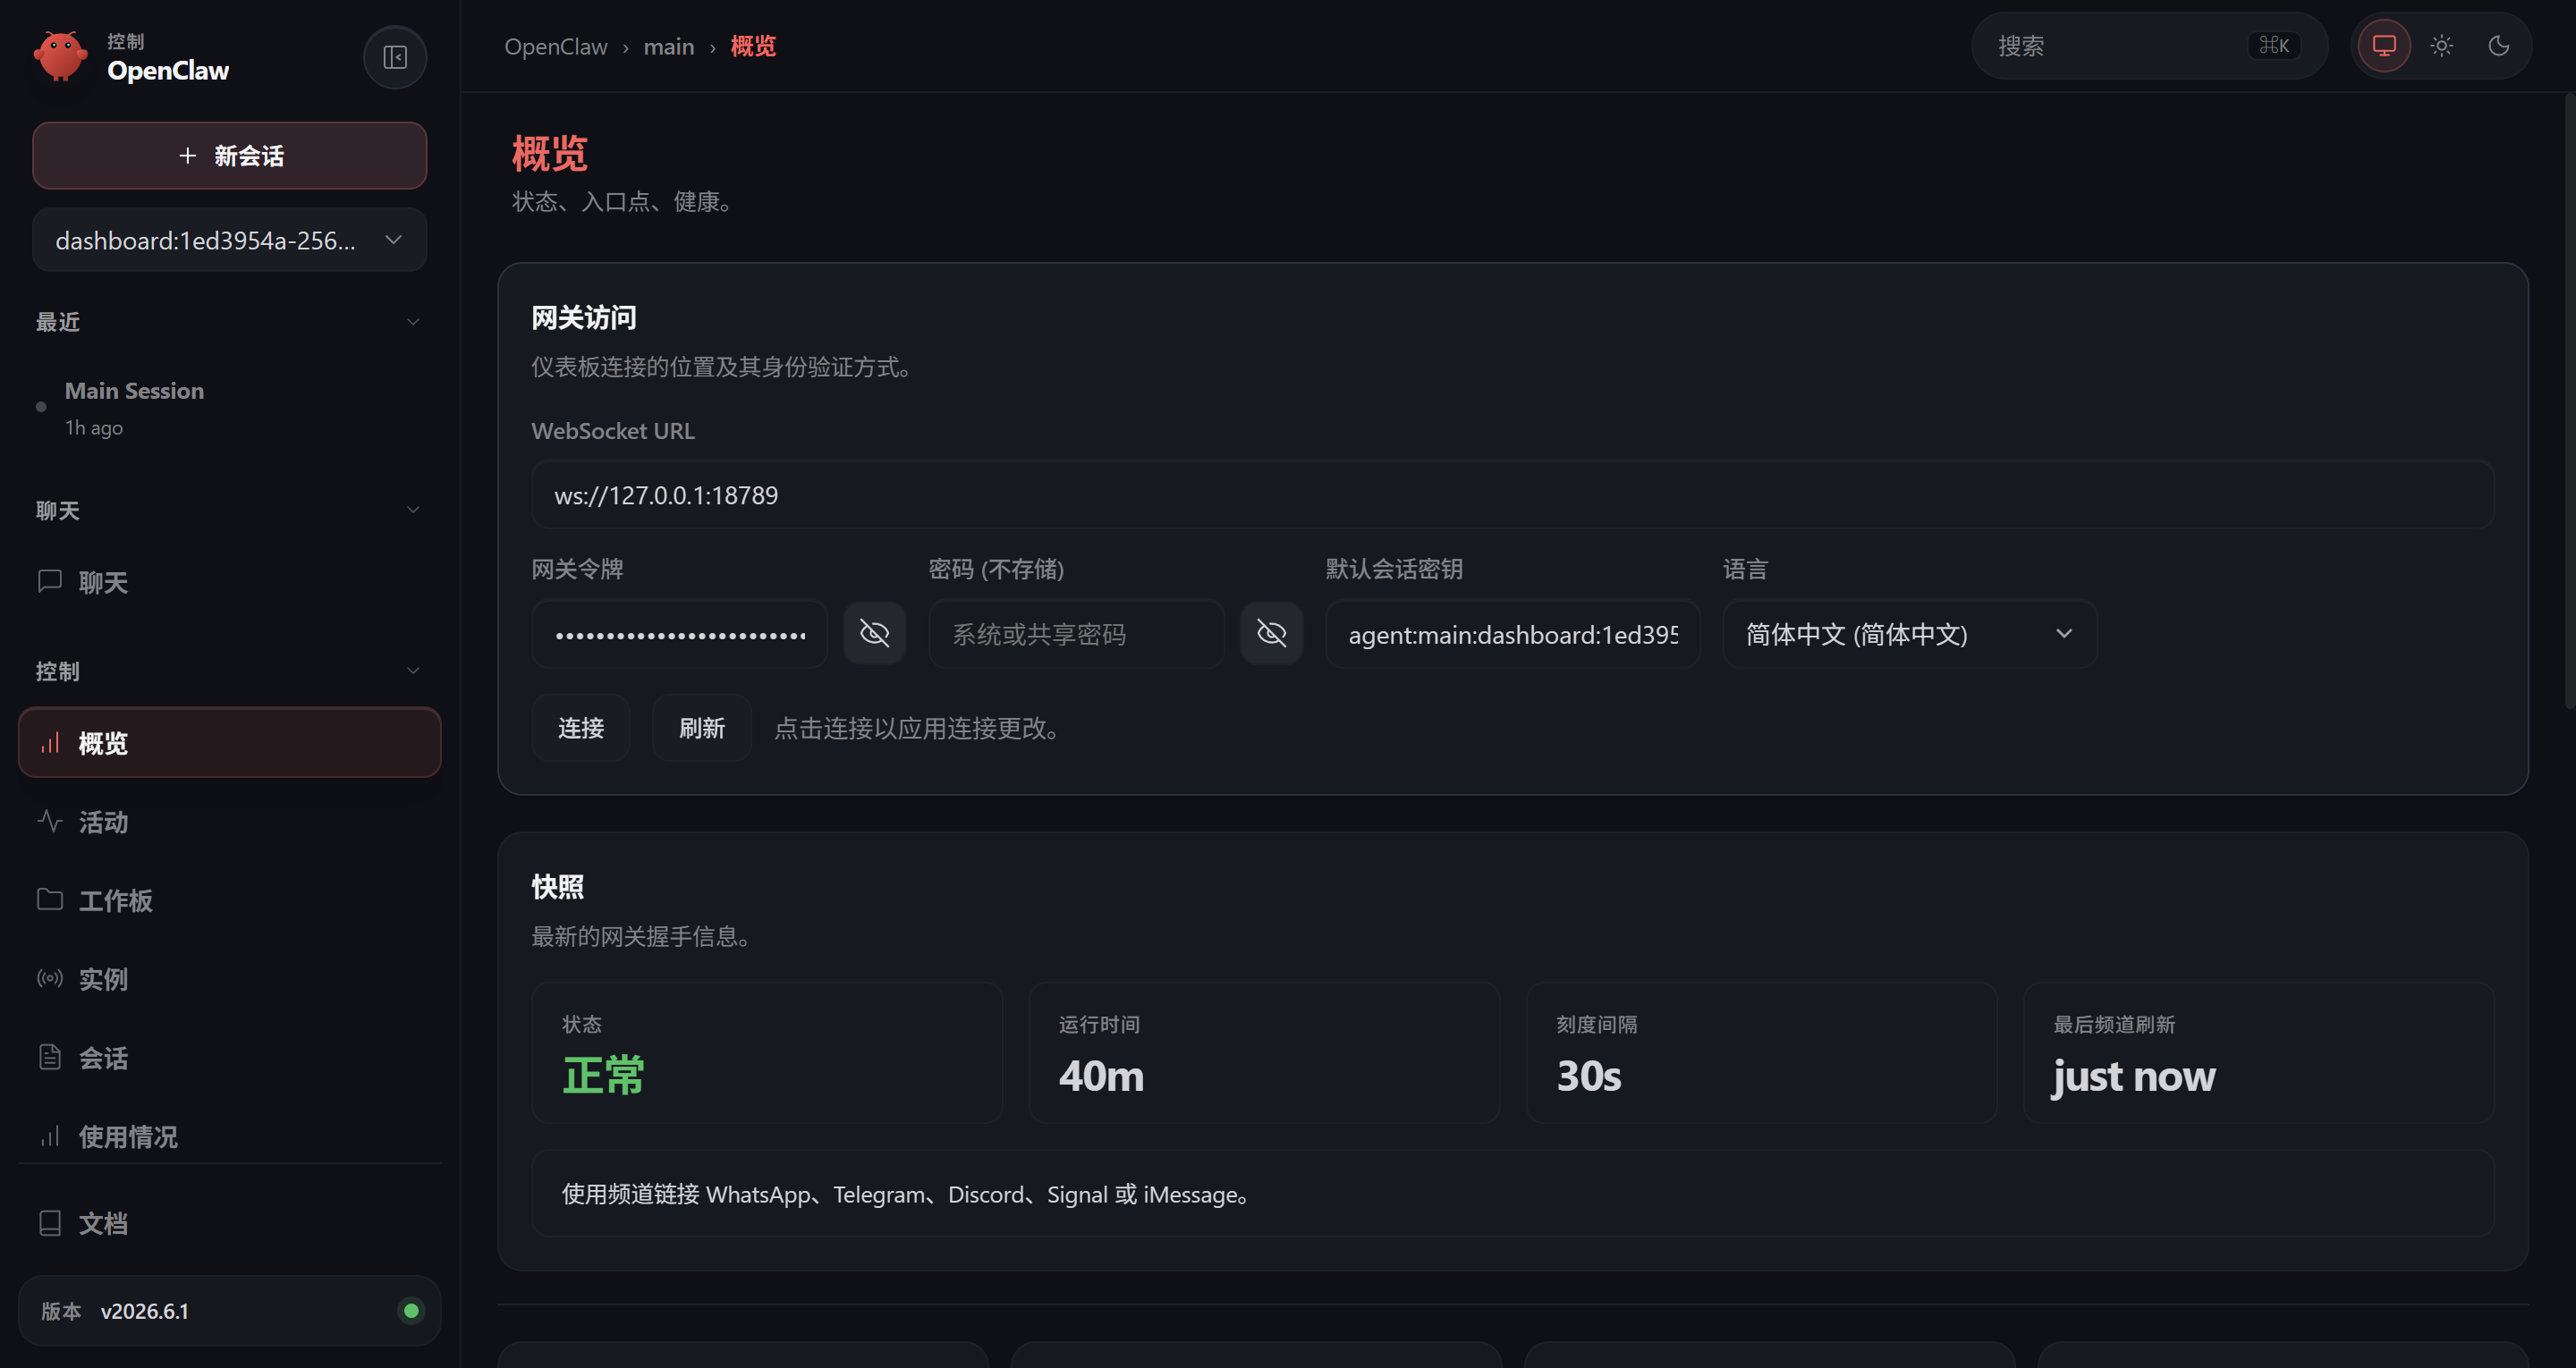
登录后即可进入控制台页面
在左侧有各种功能的菜单栏,如聊天、控制、代理、设置等,可以对 OpenClaw 实例进行管理。
开发第一个Skill OpenClaw Skill 开发很简单,核心就是创建一个带有 YAML 前置元数据的 SKILL.md 文件。下面是完整流程。
1. Skill 的结构 my-skill/
2. SKILL.md 格式 ---description: "简短描述,一句话说清楚这个 Skill 做什么。" --- # 标题 **它不知道的特定流程、命令、约束和注意事项** 。## 工作流程 1. 第一步做什么2. 第二步做什么3. 验证结果
前端元数据字段:
name — 必需,Skill 名称description — 必需,用引号包裹,简短描述(会展示在 Skill 列表中)metadata / homepage / allowed-tools / user-invocable / license — 可选
3. Skill 存放位置(优先级从高到低)
位置
说明
workspace/skills/工作区 skills 目录,优先级最高
Plugin bundles
通过 openclaw plugins install 安装的第三方技能包
~/.openclaw/skills/托管技能
OpenClaw 内置
随 OpenClaw 发布的系统技能
4. 两种创建方式 方式 A:使用 skill_workshop 工具(推荐走提案流程) 通过 skill_workshop 创建的是一个提案(proposal) ,需要审批后才能成为正式 Skill。这适合需要审核或协作的场景。
方式 B:直接手动创建 在 workspace 下直接创建目录和文件:
mkdir -p ~/.openclaw/workspace/skills/my-skill
重启 Gateway 后生效。这种方式最直接,适合个人使用。
5. 写好 Skill 的要点
精简 :不要重复模型已知的通用知识**只放”它不知道的”**:特定命令语法、认证注意事项、安全规则、项目约定
具体的工作流程 :列步骤,别光说大原则用列表代替表格 (除非表格真的有必要)
6. 示例 获取当前服务器运行信息 Skill:
~/.openclaw/workspace/skills/server-info/
SKILL.md内容如下:
1 2 3 4 5 6 7 8 9 10 11 12 13 14 15 16 17 18 19 20 21 22 ---description: "获取Ubuntu服务器信息:时间、系统、CPU、内存、磁盘、网络" --- # 服务器信息 ## 执行方式 `scripts/server_info.py` 并输出结果:```bash python3 scripts/server_info.py ``` ## 输出规则 - **只输出脚本的完整原始输出,不要添加任何额外文字、解释、前缀或后缀。** - 不要包装在代码块中(除非用户明确要求)。- 脚本输出即为你的全部回复内容。
scripts/server_info.py内容如下:
1 2 3 4 5 6 7 8 9 10 11 12 13 14 15 16 17 18 19 20 21 22 23 24 25 26 27 28 29 30 31 32 33 34 35 36 37 38 39 40 41 42 43 44 45 46 47 48 49 50 51 52 53 54 55 56 57 58 59 60 61 62 63 64 65 66 67 68 69 70 71 72 73 74 75 76 77 78 79 80 81 82 83 84 85 86 87 88 89 90 91 92 93 94 95 96 97 98 99 100 101 102 103 104 105 106 107 108 109 110 111 112 113 114 115 116 117 118 119 120 121 122 123 124 125 126 127 128 129 130 131 132 133 134 135 136 137 138 139 140 141 142 143 144 145 146 147 148 149 150 151 152 153 154 155 156 157 158 159 160 161 162 163 164 165 166 167 168 169 170 171 172 173 174 175 176 177 178 179 180 181 182 183 184 185 import osimport platformimport shutilimport socketimport subprocessfrom datetime import datetimedef run_cmd (command ):"""执行系统命令并返回结果""" try :True ,True ,5 return result.stdout.strip() if result.returncode == 0 else "获取失败" except Exception as e:return f"执行异常: {e} " def format_bytes (size ):"""字节转换为易读格式""" "B" , "KB" , "MB" , "GB" , "TB" , "PB" ]float (size)for unit in units:if size < 1024 :return f"{size:.2 f} {unit} " 1024 return f"{size:.2 f} PB" def get_timezone_info ():print ("========== 时间与时区 ==========" )print (f"当前时间: {datetime.now().strftime('%Y-%m-%d %H:%M:%S' )} " )print (f"UTC时间: {datetime.utcnow().strftime('%Y-%m-%d %H:%M:%S' )} " )"timedatectl | grep 'Time zone' | sed 's/^[ ]*//g'" )print (f"时区信息: {timezone} " )"timedatectl" )print ("\n完整时间配置:" )print (timedatectl)print ()def get_system_info ():print ("========== 系统信息 ==========" )print (f"主机名: {socket.gethostname()} " )print (f"系统: {platform.system()} " )print (f"发行版本: {platform.platform()} " )print (f"内核版本: {platform.release()} " )print (f"系统架构: {platform.machine()} " )"cat /etc/os-release | grep PRETTY_NAME | cut -d= -f2 | tr -d '\"'" )print (f"Ubuntu版本: {os_release} " )"uptime -p" )print (f"运行时间: {uptime} " )"cat /proc/loadavg" )print (f"系统负载: {loadavg} " )print ()def get_cpu_info ():print ("========== CPU 信息 ==========" )"lscpu | grep 'Model name' | sed 's/Model name:[ ]*//g'" )"lscpu | grep 'Architecture' | awk '{print $2}'" )"lscpu | grep 'Socket(s)' | awk '{print $2}'" )"lscpu | grep 'Core(s) per socket' | awk '{print $4}'" )"lscpu | grep 'Thread(s) per core' | awk '{print $4}'" )print (f"CPU型号: {cpu_model} " )print (f"CPU架构: {cpu_arch} " )print (f"逻辑CPU核心数: {cpu_cores} " )print (f"物理CPU数量: {sockets} " )print (f"每颗CPU核心数: {cores_per_socket} " )print (f"每核心线程数: {threads_per_core} " )print ("\nCPU详细信息:" )print (run_cmd("lscpu" ))print ()def get_memory_info ():print ("========== 内存信息 ==========" )try :with open ("/proc/meminfo" , "r" , encoding="utf-8" ) as f:for line in f:":" , 1 )int (value.strip().split()[0 ]) * 1024 except Exception as e:print (f"读取内存信息失败: {e} " )return "MemTotal" , 0 )"MemAvailable" , 0 )"MemFree" , 0 )"SwapTotal" , 0 )"SwapFree" , 0 )print (f"总内存: {format_bytes(total)} " )print (f"已用内存: {format_bytes(used)} " )print (f"可用内存: {format_bytes(available)} " )print (f"空闲内存: {format_bytes(free)} " )print (f"Swap总量: {format_bytes(swap_total)} " )print (f"Swap已用: {format_bytes(swap_used)} " )print (f"Swap空闲: {format_bytes(swap_free)} " )print ("\nfree -h 输出:" )print (run_cmd("free -h" ))print ()def get_disk_info ():print ("========== 磁盘信息 ==========" )print ("磁盘分区使用情况:" )print (run_cmd("df -hT" ))print ("\n块设备信息:" )print (run_cmd("lsblk -o NAME,SIZE,TYPE,FSTYPE,MOUNTPOINT,MODEL" ))print ("\n根目录磁盘使用:" )"/" )print (f"根目录总容量: {format_bytes(total)} " )print (f"根目录已使用: {format_bytes(used)} " )print (f"根目录剩余: {format_bytes(free)} " )print (f"根目录使用率: {used / total * 100 :.2 f} %" )print ()def get_network_info ():print ("========== 网络信息 ==========" )print (f"主机名: {socket.gethostname()} " )try :except Exception:"获取失败" print (f"本机IP: {ip} " )print ("\n网卡IP信息:" )print (run_cmd("ip addr show" ))print ("\n默认路由:" )print (run_cmd("ip route" ))print ()def main ():print ("========================================" )print (" Ubuntu 服务器信息检测脚本" )print ("========================================" )print ()print ("========== 检测完成 ==========" )if __name__ == "__main__" :
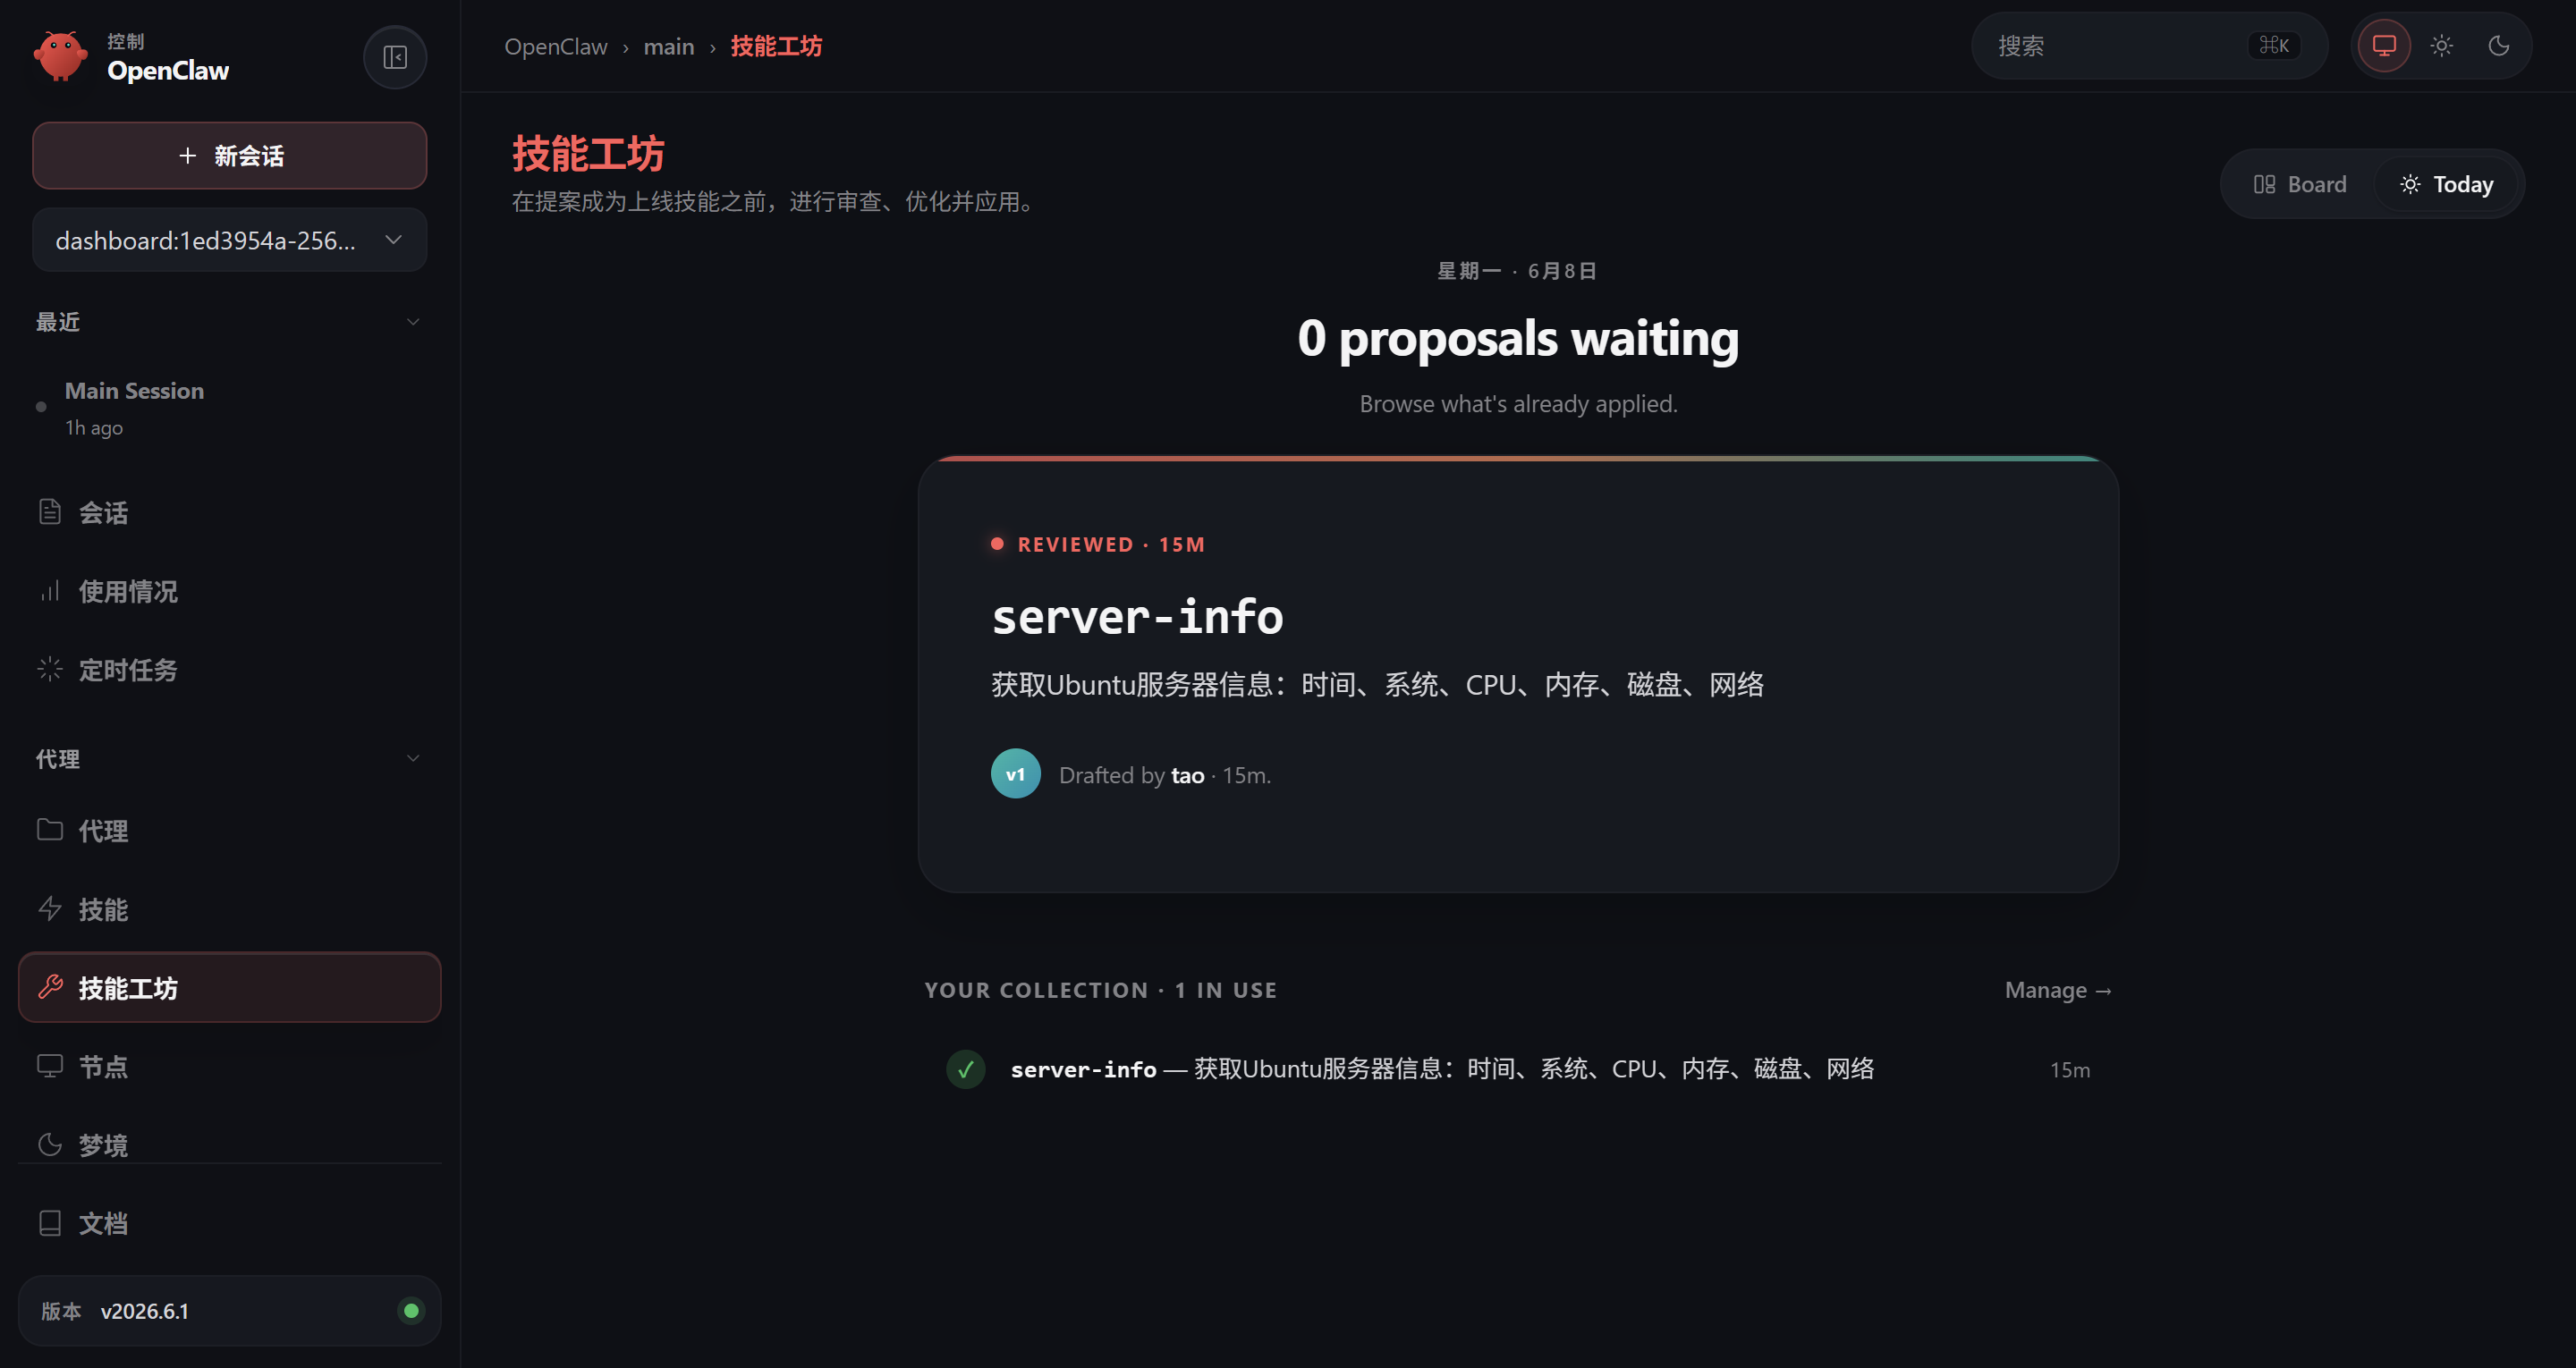
创建好的技能可以在管理页面中查看:
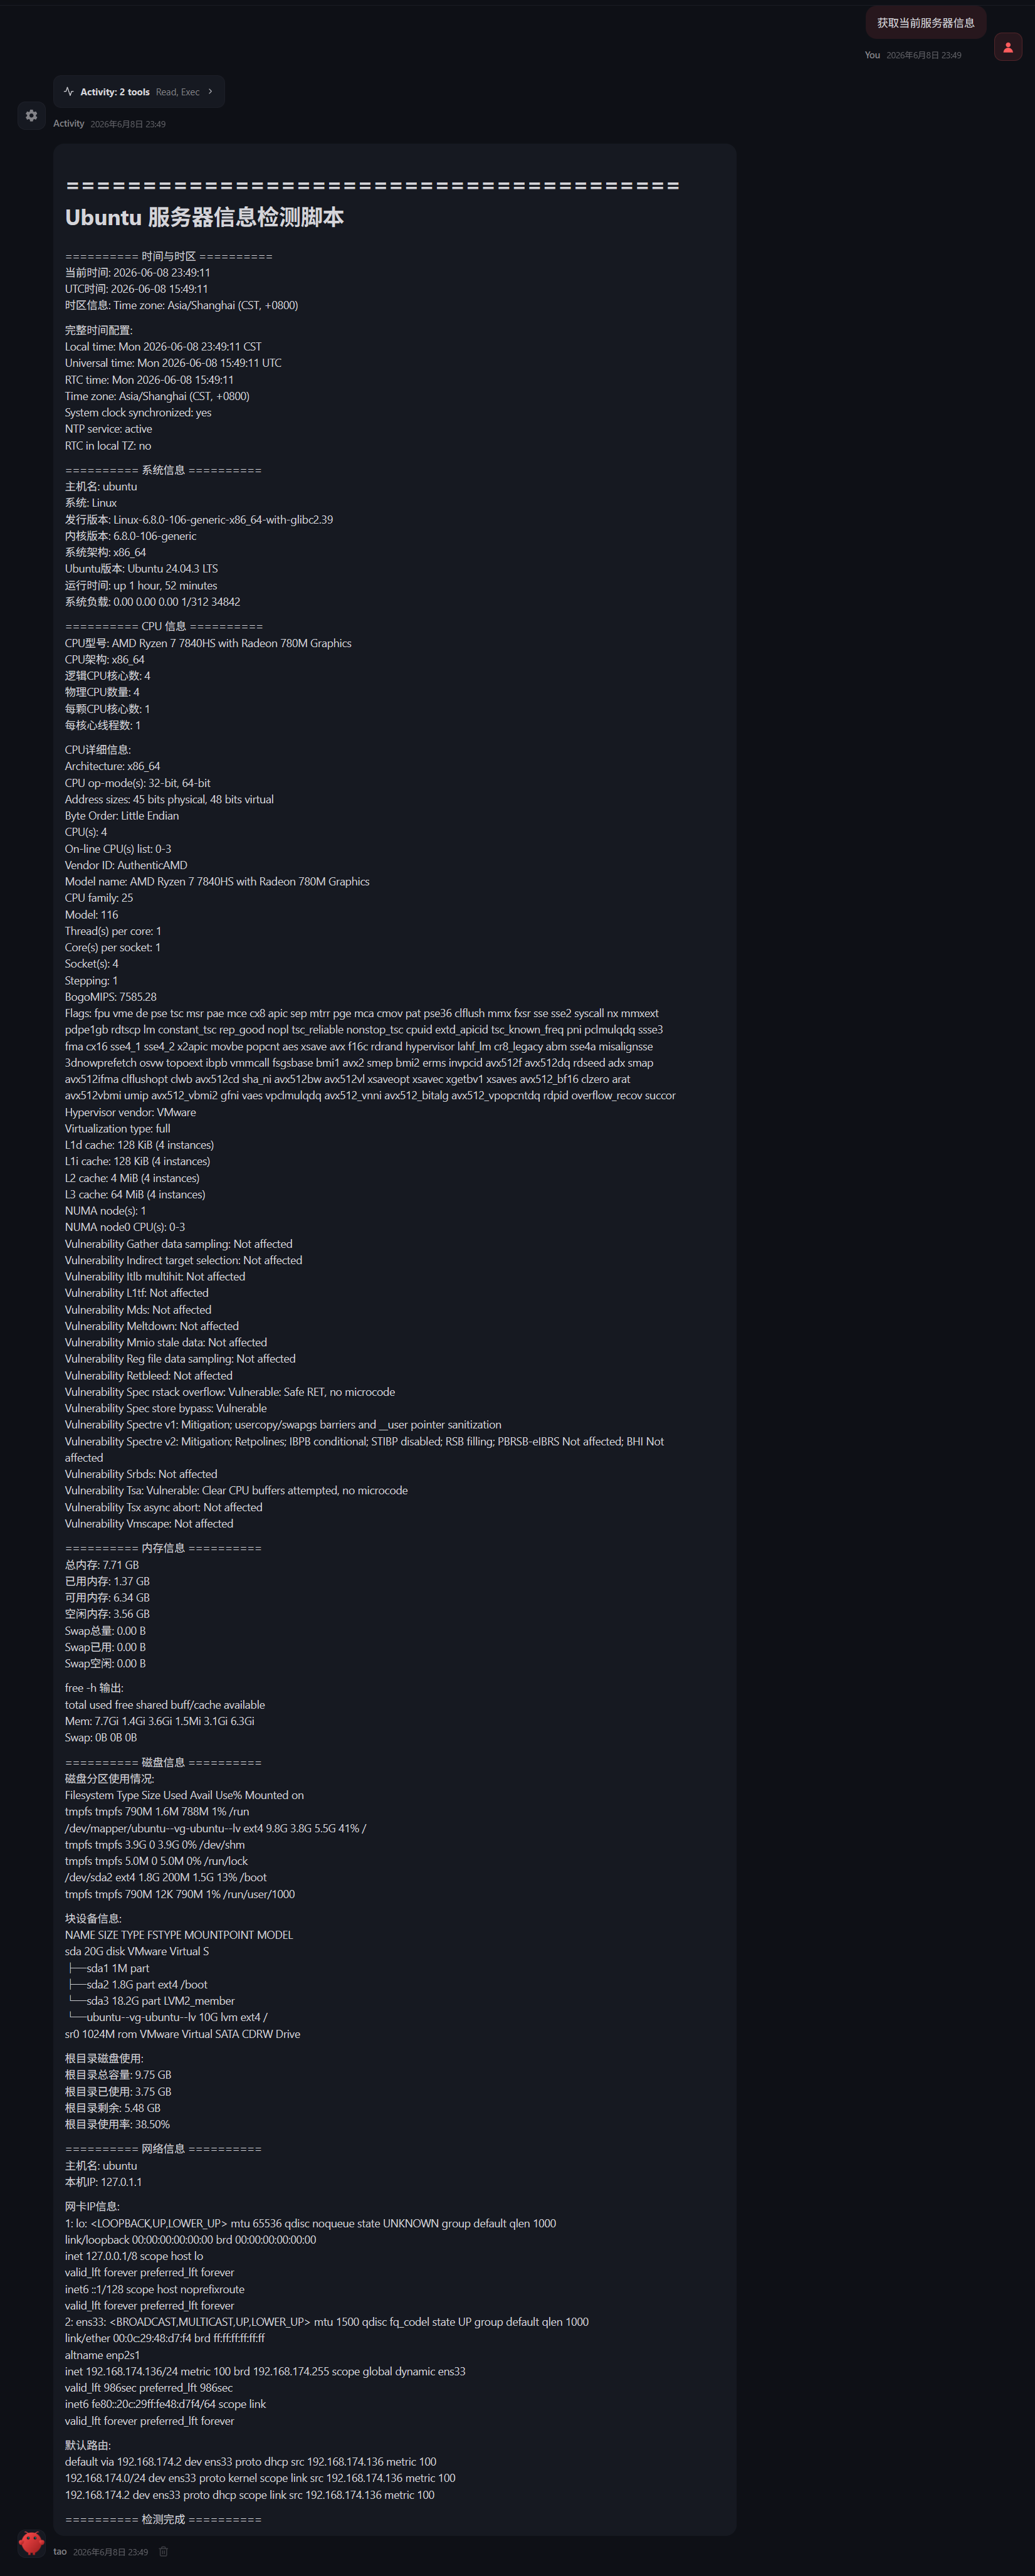
测试:新开会话中,OpenClaw 能执行脚本并告知我们脚本的执行结果
接入微信 安装插件 快速安装:
npx -y @tencent-weixin/openclaw-weixin-cli install
手动安装:
openclaw plugins install "@tencent-weixin/openclaw-weixin" set plugins.entries.openclaw-weixin.enabled true
安装后重启 Gateway 网关:
登录 在运行 Gateway 网关的同一台机器上运行二维码登录:
openclaw channels login --channel openclaw-weixin
用手机上的微信扫描二维码并确认登录。成功扫码后,插件会在本地保存账号令牌。
要添加另一个微信账号,请再次运行相同的登录命令。对于多个账号,请按账号、渠道和发送者隔离私信会话:
openclaw config set session.dmScope per-account-channel-peer
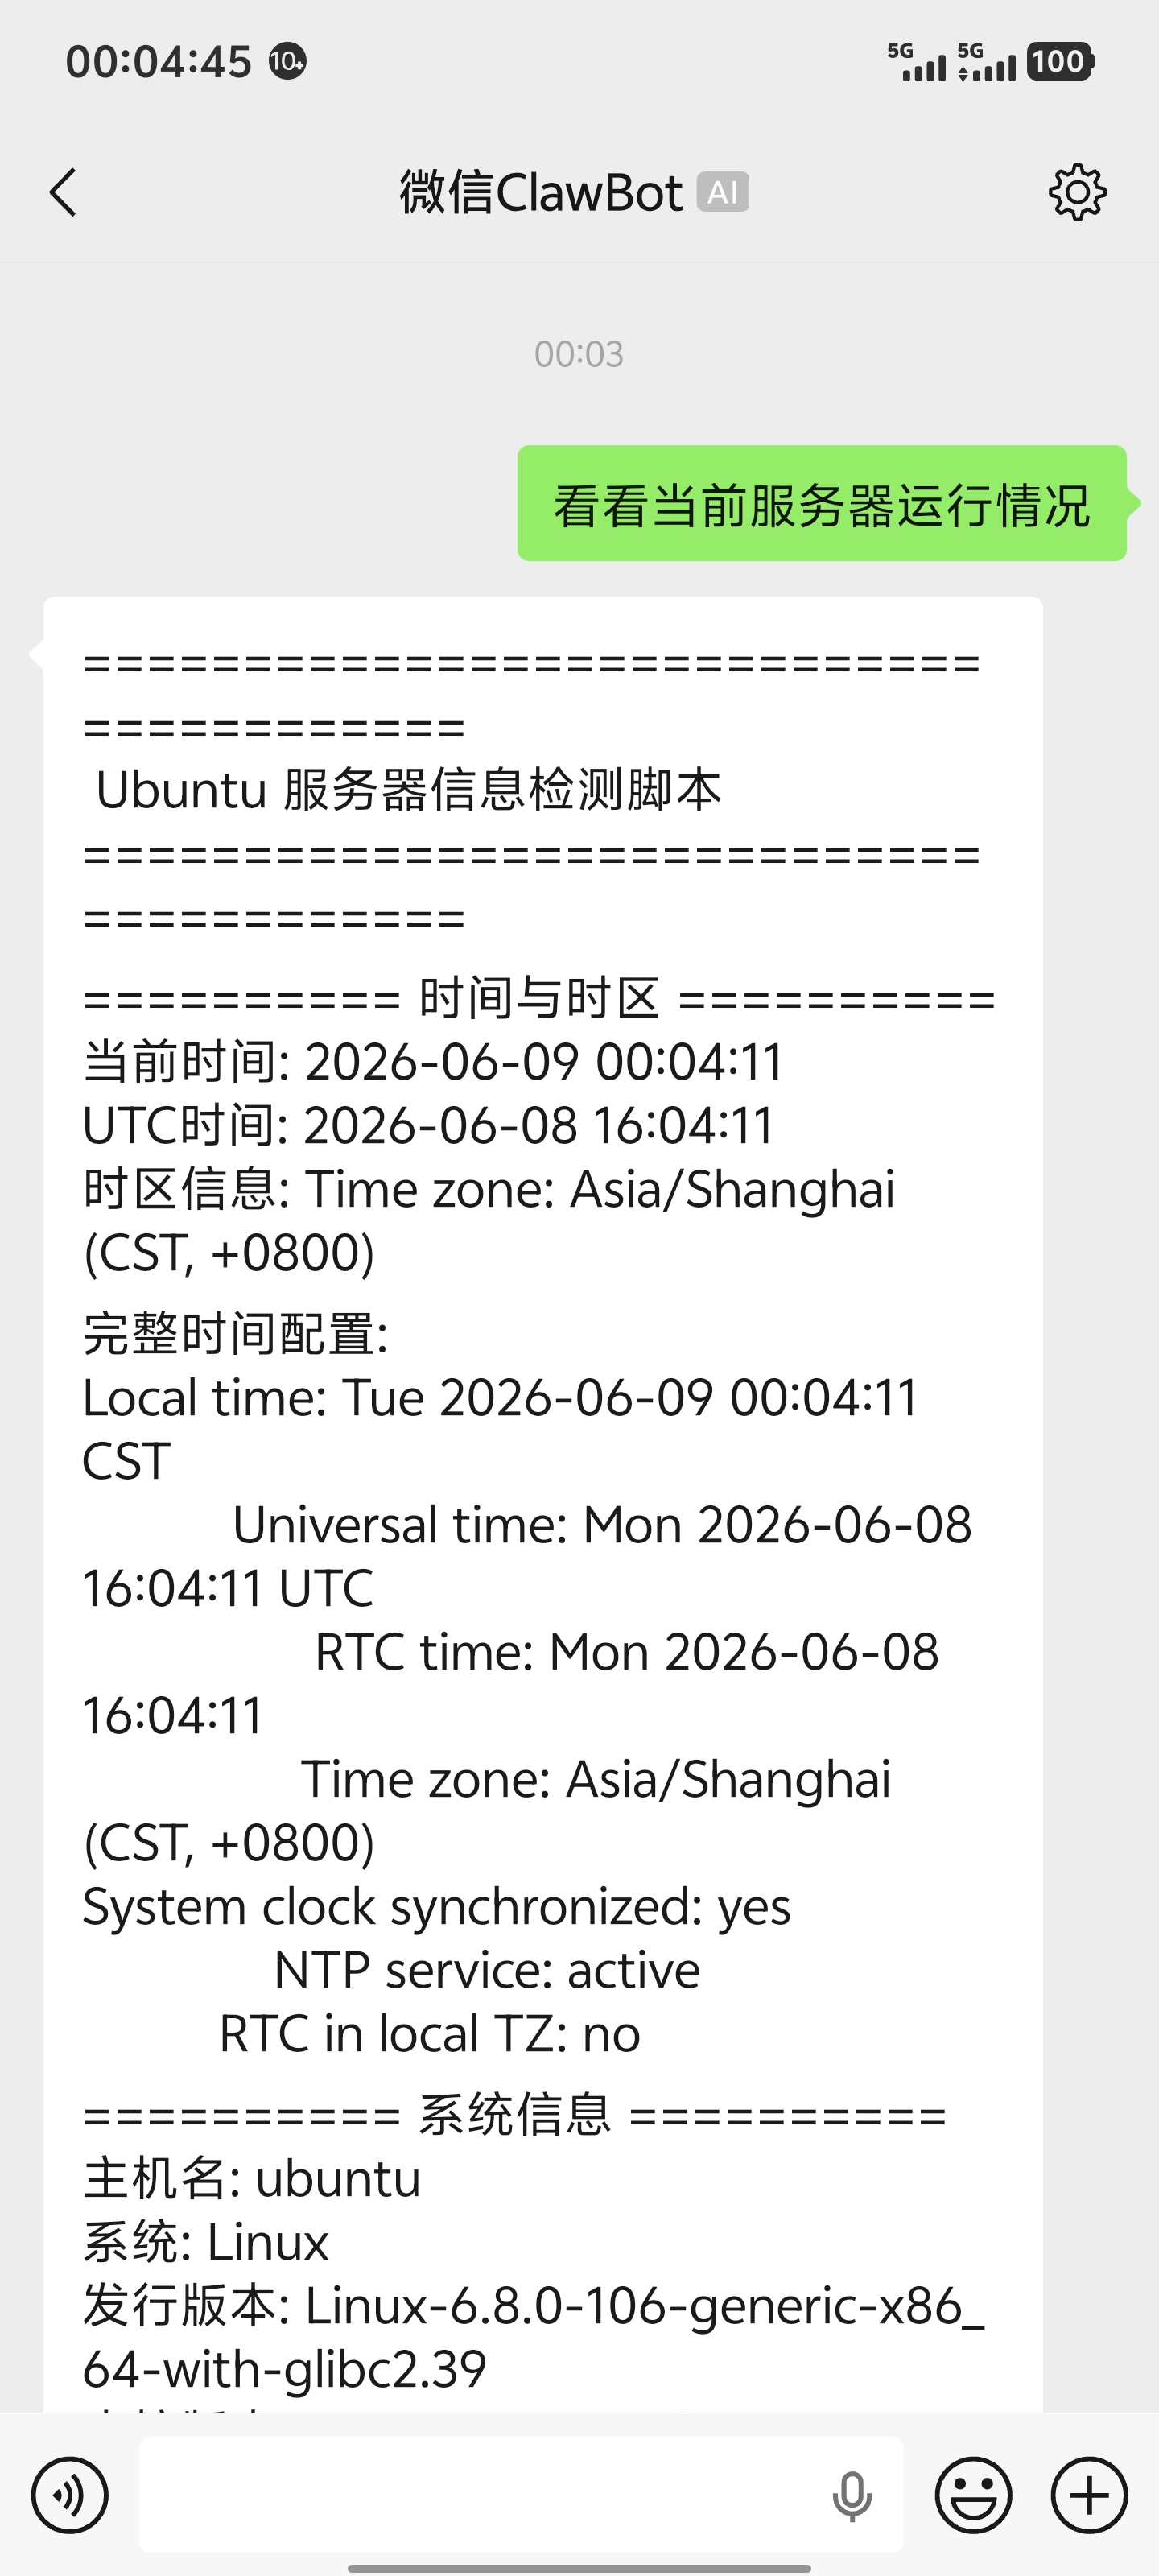
对话 接入微信以后,可以在微信与“微信ClawBot”进行对话,如:
总结 到这,你已经拥有一个跑在自己服务器上的 AI 助手了——能在终端里聊天,能通过 Web 控制台远程管理,甚至能接入微信随时响应。OpenClaw 的能力远不止这些:你还可以用它开发自定义 Skill 扩展专业能力,配置定时任务做自动化巡检。不过最重要的,是从”装好”到”用好”的那一步——每天用它、磨合它、让它真正融入你的工作流。希望这篇指南能帮你迈出这第一步。